Before you can knit anything, you have to cast on. That is, you have to place a row of stitches on your knitting needle. Casting on is an essential element of knitting that does not always get the attention it is due. I suspect that there is many an elderly lady out there who has been knitting all her life and never used anything but the buttonhole cast-on, thus impoverishing many a knitted garment. It's unfortunate, especially since these grandmotherly types often don't know their way around a computer very well and are not likely to find their way to my blog. Still, I hope my cast-on roundup with be useful to those who do.
Cast-Ons All Knitters Should Know
Buttonhole Cast-On
Let's get the most basic cast-on out of the way first. The buttonhole cast-on is the easiest and commonest of the cast-ons. Here's how you do it:
 Step Zero
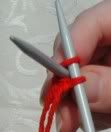
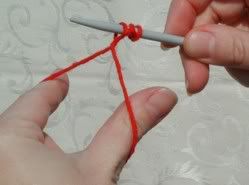
Make a slip knot in the yarn, slip the needle through the loop, and tighten.
I call this step zero because, in the case of buttonhole cast-on, it's not really necessary. I don't usually bother to do it. I just do one stich more than I need (see following steps), which falls away once you've knitted all your required stitches.
In fact, if you're using buttonhole cast-on for its eponymous purpose--to create a buttonhole--Step 0 is completely pointless and must be skipped.
Step 1
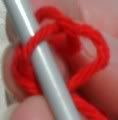
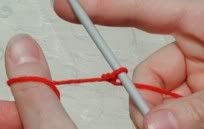
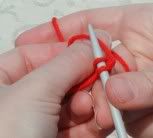
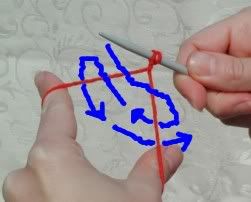
 Loop yarn counter-clockwise around your index finger.
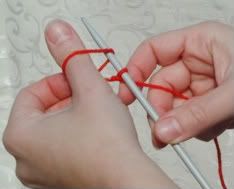
Step 2
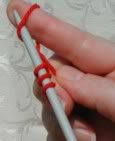
Insert the knitting needle into the stitch in the same direction as the finger. Slide finger out and tighten stitch on needle, but leave a little slack. Overly tight buttonhole-cast-on stitches are hell to knit.
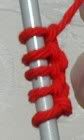
Repeat steps 1 and 2 until you have sufficient stitches.
The buttonhole cast-on has its advantages. It's easy and fast to do, and that makes it fun as well--watching the stitches pop off your finger and onto the needle, one after the other, as if by magic. If you're a brand-new knitter, it's the cast-on you should learn to do first, as it's easy and will help you get the hang of cast-ons in general. It's also serviceable if you need to add extra stitches to a piece of knitting already in process--say, if you're making a buttonhole. But the cons outnumber the pros. The buttonhole cast-on is more difficult to knit than any other. Being only loops with a twist, the stitches readily tighten up until you can't get your needle in, and then you have to work them loose with your fingers. There is no distinction between one stitch and another, so as you go, the loose piece of yarn between the knitted stitch and the stitch not yet knitted gets longer and longer. For this reason, buttonhole cast-on should only be used when a small number of stitches are required.
Finally, buttonhole cast-on results in a tight, unyielding edge. If you want an edge that is at all stretchy, for a cuff for example, your best bet is the longtailed or thumb cast-on, but even the cable cast-on will work better than the buttonhole.
This is the tragedy of so many handmade knits. If you have ever received a gift of hand-knitted socks or mittens, or perhaps a sweater, or if you have ever taken a close look at such products in a flea market, you have probably seen it: a ribbed cuff that terminates in an unyielding little band that renders all that nice stretchy ribbing pointless, a band that barely permits your hand (or foot, whichever the case) to pass. That's the buttonhole cast-on. It's the only cast-on that many people know. Let's all work to change that.
Cable Cast-On
A step up from the buttonhole is the cable cast-on. While still not your best bet for a stretchy edge, it's an improvement on the buttonhole. The advantage of both these cast-ons is that you can use them to add stitches to a knitted piece in progress, something you can't do with the stretchier (and more fun) longtailed cast-on.
Step 1
Make a slip knot in the yarn (as shown above), slip the needle through the loop, and tighten.
 Step 2
Insert the other needle into the stitch knitwise. (To insert a needle knitwise means "as if to knit." This is in contrast to purlwise: "as if to purl." When you knit, you insert the right-hand needle in the same direction as the left-hand needle. When you purl, you insert the right-hand needle in the opposite direction as the left-hand needle.)
Knit, pull the stitch through and over the tip of the left-hand needle. This makes the second stitch.
Step 3
Insert the right-hand needle in between the last stitch created and the one before. Knit, pull the stitch through and place it over the tip of the left-hand needle.

Repeat step 3 until you have sufficient stitches.
So basically, with cable cast-on, you knit the stitches onto the needle, first through the original stitch, and subsequently in between the last and next-to-last stitches.
Why is the cable cast-on called that? I don't know, so I'll hazard a guess. It's called cable cast-on because it's used as a beginning for cable knitting, and the reason it's used for cable knitting is because cable knitting doesn't require an especially stretchy edge. If you're knitting a cable sweater, it will probably have ribbed cuffs and lower edge, and for those you'd want a stretchy edge. But you could be knitting a cable afghan, for which a stretchy edge is not so vital. You could still use longtailed cast-on if you wanted to; it's just that there'd be no big advantage to it.
Don't start your cable afghan with a buttonhole cast-on though. Don't start any major project with a buttonhole cast-on. Save buttonhole cast-on for buttonholes and practice pieces that you plan to unravel afterwards. Or use buttonhole cast-on to knit for your enemies (if you are so saintly a soul as to knit for your enemies).
Longtailed or Thumb Cast-On
As I've already stated, longtailed cast-on is the undisputed best for a stretchy edge. If you're making socks, mittens or a sweater, you should start with a longtailed cast-on. You owe it to yourself to learn to do it, even though... you knew there was a catch coming, didn't you?... getting started is a little more complicated than it is for the other cast-ons.
Longtailed cast-on gets its name from the fact that you need to start it off with a long tail. More to the point, you need a tail of the right length, and that length will vary depending upon how many stitches you want to cast on. If you give yourself too short a tail, you'll run out and will be a most unhappy knitter when you have to unravel all your cast-on stitches and start over again.
What to do? The average knitting book would have you calculate the necessary length. I can't remember what the calculation is, and anyway it will vary depending on needle size and yarn gauge. But it doesn't matter. Screw all that. There's a much better way to determine the required length of your tail and it involves no calculating or measuring. It's a method I've developed myself and it's never failed me.
Determining Tail Length
Hold up your needle in your left hand. Let a length of yarn hang past it, say six inches. You want to start off with some excess so you'll have a margin for error.
 Step 2
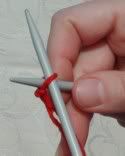
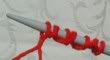
Wrap the yarn around the needle, counting the wraps as you go.
If you run out of needle, squish the yarn over to the far end of the needle to give yourself more space.
Keep wrapping until you have counted as many wraps as you need stitches. (If you need ten stitches, wrap the yarn ten times.)
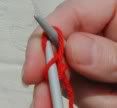
Firmly grasp the yarn in front of the wraps between thumb and forefinger and let go of the needle. Let all the wraps unroll until the needle falls out. You now hold the correct length of tail.
The Actual Cast-On
Don't let go of that yarn! The spot you're holding on to is the spot where your first stitch needs to go. Tie a slip-knot in that spot (as shown above), slide the needle through the loop and tighten.
 Step 2
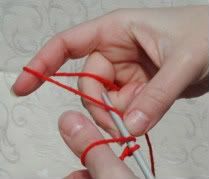
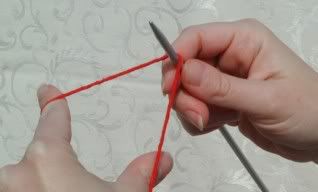
Arrange the yarn so that the long tail is to your right and the ball of yarn is to your left. Hold the needle in your right hand. Take the yarn leading to the ball and wrap it around your left thumb counterclockwise. The speedy way to do this is to hold the yarn in your left fingers and bring your thumb down upon it from the top, then swish your thumb around counterclockwise to wind up the yarn. (This is the reason that the other name for this cast-on is thumb, in case you haven't figured that out by now.)
 Step 3
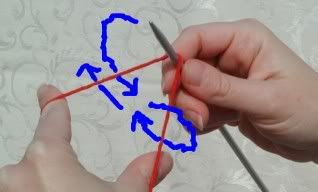
This part is similar to Step 2 of the buttonhole cast-on, only with a thumb instead of a finger. Insert the knitting needle into the stitch in the same direction as the thumb. But here's where it varies from the buttonhole cast-on: don't slide your thumb out of the loop. Keep it there.
Transfer the needle from right hand to left hand, pick up the long tail in your right hand and wrap it over the top of the needle.
Then use your thumb to pull the thumb loop over the tip of the needle.
 Pull on both loose ends of yarn until the stitch tightens.
See how it works? The loop from the long tail makes the stitch, and the loop from the thumb holds that stitch in place around the bottom. That's what makes this cast-on stretchy.
Repeat Steps 2 to 4 until you have the required number of stitches.
You can see that this cast-on requires more dexterity than the other two, what with handling two lengths of yarn and passing the needle back and forth between hands. But with a little practice, you'll fly along and this cast-on will be just as much fun as buttonhole cast-on, only it will be much more fun to knit on because your stitches won't keep shrinking on you. And your cuffs will look and feel fabulous.
More Esoteric Cast-Ons
The three cast-ons I have shown you here will serve you well for a lifetime of knitting, but if you care to experiment, there are others to try. In the same way that buttonhole cast-ons are for buttonholes, cable cast-ons are for cable knits and for adding stitches to knitting pieces in progress, and longtailed cast-ons are for stretchy ribbed edges, the more unusual cast-ons were created with specific knitting situations in mind.
Double-Knit Cast-On
Double-knitting is a technique whereby every even stitch becomes part of the front of the fabric and every odd stitch becomes part of the back of the fabric. The result is a fabric that's double thickness, and you need twice as many stitches to achieve the same width. Frankly, I'm not sure what double-knitting is good for and why it exists, but it does, and so there's a special cast-on for it. You don't have to use it--other types of cast-on will work for double-knitting--but it has a peculiar advantage.
Double-knit cast-on, like longtail cast-on, requires a long tail, so do the three steps given in Deterining Tail Length. Then, instead of making a slip knot, fold the yarn in half at the point where you gripped it between your thumb and index finger. Now you're ready to begin.
Step 1
 Hold the needle in your right hand and the folded yarn in your left, and slip the point of the needle into the fold from underneath.
Step 2
From above, slip your index finger and thumb into the fold and open it up. You will need to hold onto the yarn with your remaining fingers. Like longtail, this cast-on takes dexterity.
This is where things get complicated, so from now on, the yarn held taut by your index finger will be called "the far yarn" and the yarn held taut by your thumb will be called "the near yarn."
Step 3
Tip the needle away from you and bend it around the far yarn. Then tip the needle towards you and bend it around the near yarn. Finally, bring the needle under the far yarn. You now have two stitches on the needle.

Step 4
Tip the needle forward over the near yarn and wrap under it. Tip the needle back over the far yarn and wrap over it as well, then duck the tip under the near yarn. You now have three stitches on the needle.
Keep alternating Steps 3 and 4 until you have enough stitches (an even number, which means you will end on Step 3, not on Step 4).
Complicated enough for you? Well, yes, but after you've done a few of these, you'll see that the alternating stitches face in different directions. That makes the odd stitches appropriate for the front of the fabric, and the even stitches appropriate for the back. It really is a cast-on you'd only want to use for double-knitting, and maybe not even then.
I got this cast-on from the Spring 2003 issue of Knitter's Magazine, the greatest knitting magazine in the known universe. Look for it on your local newsstand. If your local newsstand doesn't carry it, instead seeing fit to fill its knitting section only with more pedestrian offerings such as Vogue Knitting, tell them they suck.
That's all I have to teach you about casting on for now. Let me know what you thought of my first instructional blog post by leaving a comment. Thanks.
No comments:
Post a Comment